Monday, August 25, 2008

Getting in the groove again...

Summertime is over. My girls are back in school, and I just had my first Stamp A Stack in a while. Thanks to the really fun gals that attended. . .you are all so special to me! (Even those cranky whiners and you know who you are!) We laughed so much and had a great time. We even produced some fabulous cards and found out how to fix some minor oops and make the card even better. . .


Now this first card uses the new In Color "BAJA BREEZE" and you just know that I was tempted by my compulsions to put these flowers all in a straight line across the white but I thought of my friend Zandra and conceded a little.

The easy part of this one is that the five petal punch perfectly trims these flower images from the Ginormous Flowers stamp set!


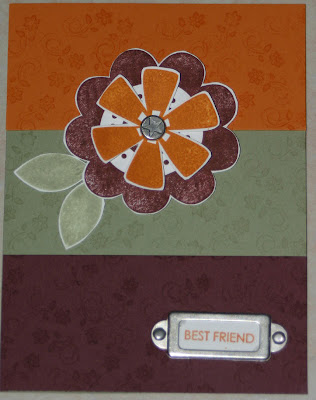
And this card uses PINK PIROUETTE and Baroque Burgundy. The wonderful new Silver Hodgepodge kit and round scallop punch add terrific dimension!

Ah, the Crab & Co. stamp set never fails to amuse me, and well of course the googlie eyes do help. KIWI KISS and PACIFIC POINT are the new In Colors here.with the scallop edge punch used on the designer paper below.


The Sock Monkey stamp set. . .very popular with teens. A saying with the white craft pad and the white gel pen on the flowers brighten the RIDING HOOD RED design. Check out all the new designer papers in the catalog. . .I want ALL of them! Oh No!!
And TANGERINE TANGO is the punch of color with Not Quite Navy and Old Olive on this simple card. The huge brad from the Silver Hodgepodge kit really makes this a special card.

Enjoy. And remember, next month is CHRISTMAS CARDS. It's never too early to start!!

Tuesday, July 8, 2008

New technique for awesome dragonflies!!!

Well, I borrowed Sylvia's Pick A Petal stamp set (Page 115 of the Idea Book) and made these lovely cards. Use WHITE STAZON to stamp on clear acetate sheets for the dragonfly wings. The body of the bug is the stick-pin from the Pretties kit with several beads from the same kit. Use glue dots to adhere the body and wings to your card. These are just too cute and so fun to make. Try it!!!


And this one uses a borrowed saying from Janet, and a lovely sparkly background provided to me by Ruthi. "Sharing is caring!!" And I have the BEST friends. Thank you, girls!!

Monday, May 19, 2008

May Stamp A Stack cards

Well, this color combination was inspired by Becki. . .I never would choose Apricot but now I love using it. Together with Groovy Guava and Barely Banana, it's a fabulous combination!


The original card had a HAPPY FATHER'S DAY stamp in the background but I'd already done one for my dad so this one just has the Not Quite Navy ink smooshed for the background. My dad loves bird watching so this one was particularly special for him.


Back to a favorite color combination of Always Artichoke and Elegant Eggplant. Circles repeated in the small circle punch and flower for the "O" and the circular clip in the corner.


Now Sylvia is to blame for this one. . .I hadn't noticed the CHUNKY GLITTER in the SU catalog but Sylvia purchased it and I had to have it too. It looks SO awesome on cards. I used Tombow adhesive on the candle flames, and sticky strip along the edges of the white cardstock to hold the glitter. It stays on really well!!


And my Friday morning gang was responsible for collectively helping with this one. Burgundy, Pumpkin and Moss are a totally different color combination for me but they look terrific together. Add some hardware from the new Hodgepodge Kit and it's an easy but beautiful card.

Oh, and the sixth design was a Double Pocket card, which I am totally addicted to. They are fun and easy. I'm hoping to take photos soon and post directions for you all.

Monday, April 21, 2008

Many thanks to Missy!


At our last knitting night, Missy showed me these incredibly cute stitch holders that she made. And so, well, since I have a surplus of beads and beading supplies, I ran home and made some too. They are super easy, and fun to make, and now I don't have to use tacky plastic stitch holders but have elegant ones to adorn my knitting. Ah, I'm so easily amused. . .

Patting myself on the back. . .


Well, miracle of miracles. . .I knit a sweater! And it came out lovely. And it fits. And it is the most deliciously feeling sweater. Malabrigo yarn in dry blue. . .very soft and warm. Okay, not ideal for Saipan, but a lovely sweater nonetheless.

Wednesday, April 9, 2008

Scrapbooking gifts. . . .


I met a new gal at the Artists Holiday Bazaar last December where she purchased one of my pre-made scrapbooks for her baby. She recently invited my husband and I to her sweet child's first birthday party where she had the album filled with photographs and on display. She did an incredible job finishing the album into a work of art.

I've made her this one to highlight Joanna's second year of life! The outside of the album has the wide grosgrain ribbon adorned with rub-ons, and a chipboard heart covered with designer paper and embellished with a cute flower.


Remember that you can click on any photograph so see a larger and more detailed image!


I used HALF of a Simply Scrappin' Kit (Crew Kids Girls) and a sheet of rub-ons. It took just a few hours, and they are SO MUCH FUN TO MAKE!!!

Wednesday, February 20, 2008

Be yourself. . .nobody else is better qualified!

I love the saying on this card. . .it's from the Smartypants stamp set in the current SU catalog. Love it!

Monday, February 18, 2008

New Fold for Cardmaking!

These two cards are done in the same style. Use 12" x 12" cardstock. . .cut at 5.5" (resulting in a 5.5" x 12" piece.) Then score at 4" from each side. Carefully cut from the bottom corner to the scored line on each side. Adhere with sticky strip! These cards are decorated with the Designer Paper in the current catalog "Bali Breeze".

Ribbons or thin cardstock can be added at the bottom with a decorative embellishment. Insert a 3.75" x 5.5" tag and you're done!

Tuesday, February 12, 2008

Bits of cork add texture to your cards!


Here I stamped the pears on designer series paper and cut them out. . .no coloring required. The cork adds nice texture, and the brads provide the balance of color.


This was easy with the beautiful felt flowers in this current catalog. And my new Smarty-Pants saying set. . .perfect for me!!


And this one stamped on cork, colored with markers and white gel pen, with a punched circle of designer paper in the middle. Great texture and easy to do!!

Friday, February 8, 2008

Knitted wool scarf


Okay, I live in the tropics and I made a wool scarf. . .I'm sure I'll find a use for it. I love this yarn. This was the first project I made after I took my lesson at the yarn store in Dennis, Massachusetts. Isn't Amy a cute little model?!

Saturday, February 2, 2008

Did I tell you I learned to knit??!!

Omigoodness. . .I took a knitting class on Cape Cod when I was home this past November. I've crocheted since I was practically in kindergarten but never could get the knitting to be loose and straight. The gal that taught me was fabulous and made it so easy. This scarf was the first project I blocked (since the knit got kind of curly). I used Patons SWS wool/soy yarn which is so lovely to work with. This one is going to my mom, who loves this color palette and hopefully loves me too.

Coordinating matchbook and candle for Sylvia's birthday!


My dear friend Sylvia's birthday was February 2nd. I had a Yankee Candle in Lotus Blossom scent (dontcha love Yankee Candles?!) and used Stampin' Up! Designer Paper (Bali Breeze) to decorate both the glass jar and the matchbooks to go with it! The large flower is cut from the design on the paper, and then we added some of the new felt flowers from the catalog. I'm pretty happy with our design. Amy and I made it together for the very special Sylvia!!
(Sylvia, I hope you have lots more birthdays in store with us!)

Wednesday, January 30, 2008

Gift from Elly

My wonderful downline Elly gave me this adorably decorated box. It's made from regular drink coasters covered with Designer Papers. The cropadile tool easily punches holes in the coasters (and many other items) to wind ribbons and keep the box in place.

This is SO darned cute! Thanks, my dear friend.

Saturday, January 12, 2008

Gifts from Maria

My friend Maria in Guam sent me these lovely items. The top photo shows a note card holder and four coordinating note cards. It's really a wonderful gift! I'm hoping she remembers to send me the pattern so I can make some for myself.


This shows the note card holder closed with the note cards inside.


And this is those cute pencil holders that I've made. They can also be done in an asian theme and used for chopsticks. . .perfect for that dinner party you've been planning. Well, Maria took it further and used them for gifting candy (umm, what are they called? the sugar in a paper tube?? , well they're yummy, and totally a blast from the past.) Thank you to Maria!!!